Learn how to use paint markers and paint pens to write on ceramic mugs or glasses. These DIY Confetti Painted Heart Mugs make an easy craft and gift ideas. They are also one of my most popular craft tutorials!
DIY Confetti Painted Heart Mugs with Sharpie Paint Pens
I have been in love with Confetti glass for many years. My favorite drinking glass is one of those original confetti rimmed glasses, I had 4 and now I’m down to one. I just can’t bear to get rid of it. They remind me of the Marbled Bottom Drink glasses I also made.
I’ve noticed people trying to replicate the Confetti Painted technique on mugs, glasses, and plates and I thought I’d try painting on a ceramic mug with paint markers and a glass tumbler. You can use any shape as a guide or freestyle any design you want. I was thrilled by how easy this was to do!

Supplies for Painting On Ceramic Mugs or Glass
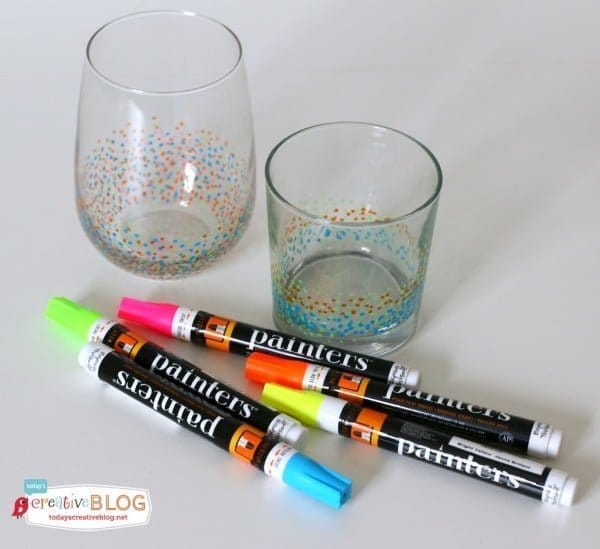
- Elmers Paint Markers – These come in so many color options. I used the neon pack for clear glass tumblers.
- Oil Based Sharpie Paint Pens – NOT MARKERS, but the paint pens. I used metallic silver and gold. These are different than your regular sharpie marker. If you’re using a regular sharpie, you’ll have to bake the item after you apply your design. I’ve never made those, so I’d google for instructions.
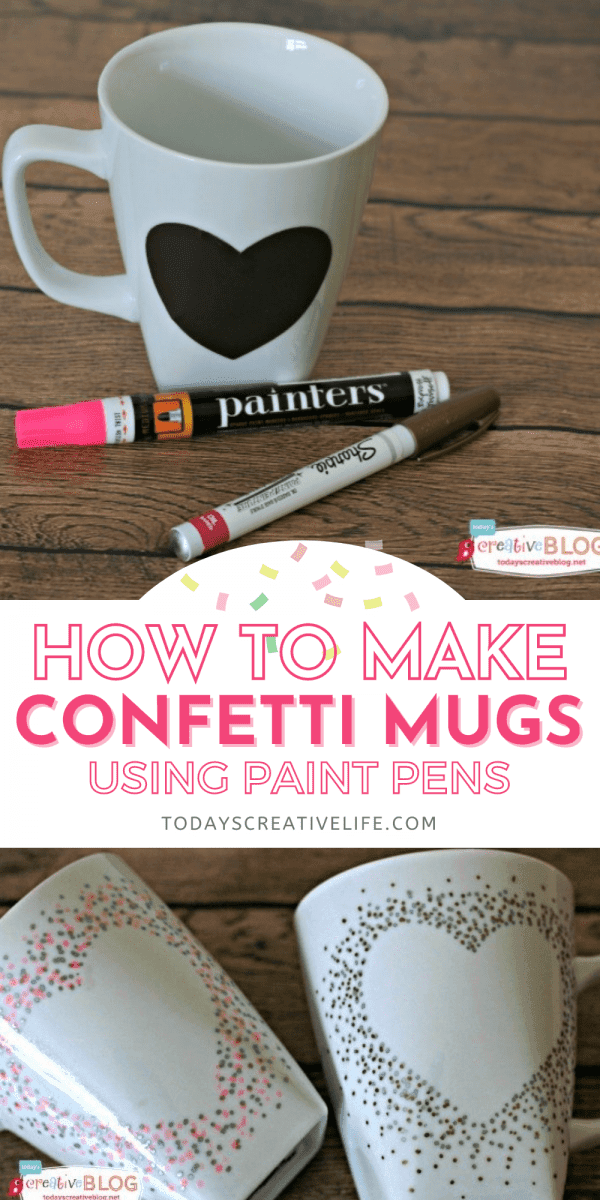
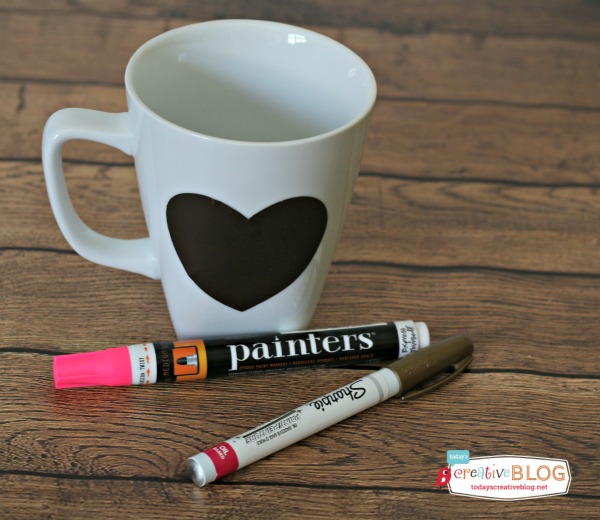
- White Mug
- Contact Paper, Vinyl, or Stickers
I had a couple of white mugs to use and used my Cricut Explore™ to cut my heart image, but you could use a heart shaped sticker or cut your own using any self adhesive paper like Contact Paper.
How To Make Confetti Painted Heart Mugs
This tutorial will share how I used the Sharpie paint pens to create fun designs on ceramic mugs. You can make a set for home or gifts. I’m using silver and gold, but the paint pens come in a variety of colors.
How to Use Paint Pens on Glass
How to use markers and paint pens on ceramics and glass.
Materials
- Sharpie Paint Pens - I used oil based
- Elmers Paint Pens - I used these on the clear glasses.
- White Ceramic Mug or Clear Glass
- Any shape cut from vinyl, or contact paper.
Instructions
- Clean your mug or glasses and wipe completely dry.
- If you're using a shape, you can cut any shape like I did use my Cricut and vinyl. If you don't have a Cricut, you can cut your own shape from contact paper freehand or using a template.
- Apply shape to your mug.

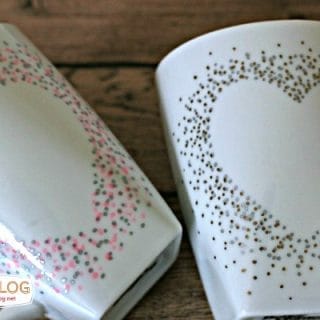
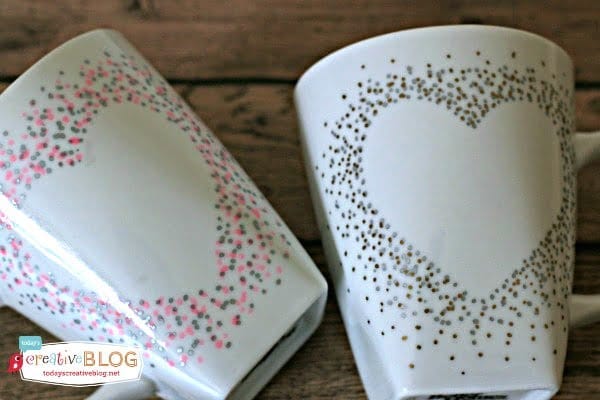
- Using one color first, outline the shape by dabbing the paint pen around the outside of the shape.

- Continue to dab the first color surrounding the shape, and move the dabs further away.
- After the first color is dry, take the second color and filled in.
- When it's dry, remove the vinyl shape.
Notes
- The Sharpie Paint Pens dried much faster, whereas Elmer's Painters Markers took about 5 to 10 minutes. The Elmer's Paint Markers bring a little texture, but the Sharpie does not.
- Hand Wash Only with a soft sponge.

This craft would make a cute and quick Valentine’s Day gift, or just use them to show your love of coffee or hot chocolate.
Once I do something I love, you should know by now, that I’ll overdo it.
I suddenly needed all my white mugs to have confetti hearts. 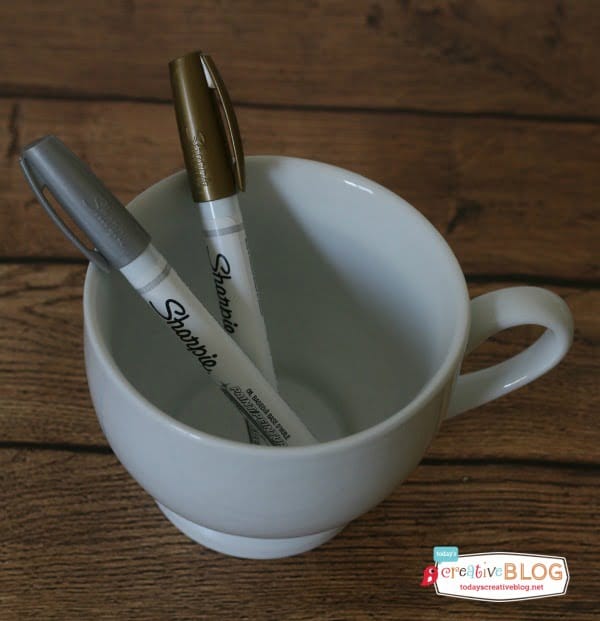 Isn’t that adorable? Let’s pretend that I didn’t mess up my heart at the bottom. Besides…… Handmade is never perfect.

How to Use Paint Pens on Glass Tumblers
- Grab any smooth clear glass tumbler along with Elmers Painter’s markers. These take longer to dry than the Sharpies. These also add a slightly bumpy texture.

- Prime the marker as directed in the instructions.
- Start with one color and start dabbing.
- Fill in with your additional colors.
- Allow to dry, per instructions.
- Hand wash.

Tips for Making Confetti Dot Glasses and Mugs
This craft is very easy, but here are a few tips to keep it that way.
- Color Combo – To get the color scheme to your liking, try dotting all the colors you want to use on a piece of paper first so you can see how they really look together.
- Practice your Dots – practice if you can on an old glass or mug. The surface is slicker than paper.
- Keep the Pen Verticle – I realized that my best dots were made when I kept the pen completely vertical, making sure to use the tip of the marker. Otherwise, you may have more of a smudge. Which is fine if that’s the shape you’re going for.
How To Wash Sharpie Painted Mugs
These particular products are pretty hearty, but you’ll still want to hand wash with regular dish soap and a soft washcloth or sponge. Any scrub sponge may wear down the design. If you’re using regular sharpies, there is a baking method to make sure the marker is permanent. You can see the Ultimate Guide to Sharpie Mugs here.

Easy Crafts To Do At Home
Easy crafts to do at home are my favorite! These crafts are great for home decor, DIY gift ideas and more.

How to Make Glitter Painted Glass Ornaments
Make any color ornament you'd like using acrylic paints, or glitter.
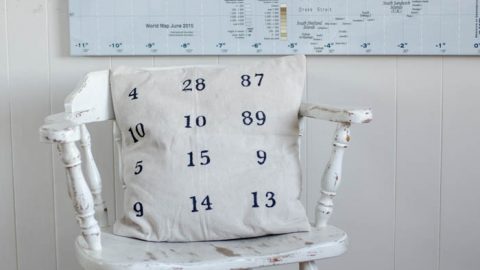
DIY Special Dates Pillow Cover
Create your own home decorating keepsake with numbers that are special to your family.


courtney says
Wow so cute!!! I made some Ohio State Buckeye ones for the 2015 Sugar Bowl with the Bucks vs.Ducks, bc I knew the Bucks would win!!!!
Kim says
Oh no! Duck fans here! But the Bucks did great!
Danielle @ Truffles n' Treadmills says
I am doing a post full of non-candy gift ideas for Valentine’s day and your mugs are going to make their way on it! Such a fun idea <3
Kim says
Thank you! Please send me a link!
Allie says
Hi Kim, I am featuring your Confetti Painted Heart Mugs tonight on a Valentines Gift Round Up. The post will go live sometime tonight.
~Allie
Kim says
Thank you Allie!
Jessica Lewis says
What a cute idea! Especially with valentines coming up!
Cookie17 says
These are so cute & easy looking Thank’s for sharing…
debi dobson says
Im so proud of you and your accomplishments. You have really made the best of your life, and after all, isn’t that what life is all about? I chuckle every time I see the words,” your middle aged husband”. Whats up with that???? LOL. I would love love to watch your am northwest show, but were in Arizona right now. We have been so blessed with so many things, the only thing im missing is your show. Any way you can send me a clip??? Love you always.
Kim says
Love you Debi! You can watch online if you want. Go to KATU.com, find the AMNW tag and search my name. 🙂 Middle aged husband ….. Since I say “my teen son” I just added Jim’s age too!
Cher torres says
Can those paints and glue paint be washed or used in dishwasher without coming off?
Kim says
Hi, The sharpie-painted mugs and glasses can be hand washed only. The paint will flake or fade if washed in a dishwasher.
Melody says
So, I did the sharpie ones for Christmas for my kids with the snowman but as soon as they got washed, the snowman came off…. 🙁 what should I do to keep it on? Thanks so much!!!
Kim says
I used the Sharpie Paint Pen, not the markers. When using the markers, you’re supposed to bake the item ….not sure how long. I would still hand wash both types.
Teresa Ellis says
Hi. Does this stay on without heating? I did one with the normal sharpies and cooked it but it is now washing off. Have some paint markers and was going to try it but wondered would it be more permanent if baked on like the sharpies?
Kim says
The paint markers don’t require any baking, however I wouldn’t place these in the dishwasher.
Kassandra says
This looks like so much fun! This is a project on my to-do list now 🙂
Kim says
It’s one of my favorites! It’s been on my list for a while too!
Alexandria says
I love these, I am actually heading out with my daughter right now to A.C. Moore to buy the sharpie paint pens to do this for our family for Valentine’s Day! Thanks, it’s so cute!